



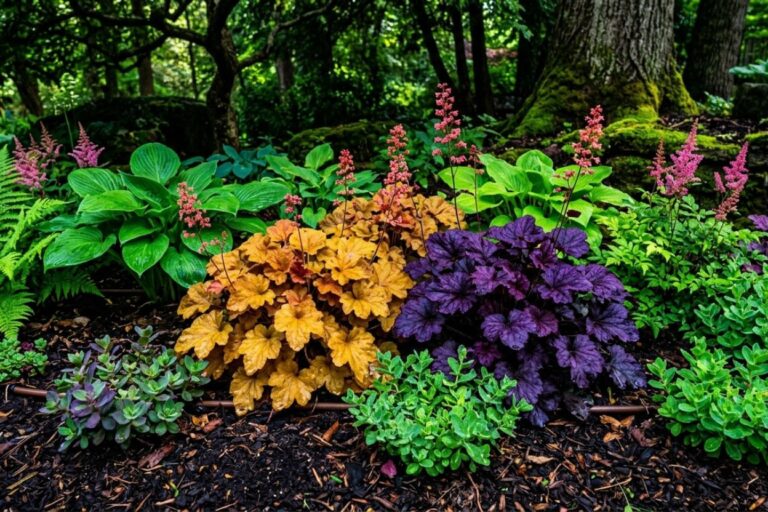
Comprehensive Introduction to Growing Haucera Successfully
The haucera plant brings extraordinary leaf colors and durable performance into modern shade landscapes. While many standard garden perennials produce flowers for just a few short weeks, haucera delivers constant color from early spring through severe winter freezes. Furthermore, plant breeders continue to release vigorous hybrids with enhanced heat resistance, stronger root systems, and stunning foliage patterns.
Gardeners love using haucera because it thrives in shaded garden spots where traditional flowering plants often struggle. Additionally, its tight foliage mounding habit makes it ideal for framing walkways, accenting rock gardens, or filling patio containers. Therefore, learning proper planting techniques will help you grow stunning foliage that brightens up dark garden corners effortlessly.
To establish the best environment for growing haucera, focus on balancing four primary requirements:
- Sunlight Conditions: Provide partial shade or filtered light, ideally allowing 2 to 4 hours of gentle morning sun.
- Soil Quality: Use rich, organic-rich soil with a well-draining structure and a neutral pH level between 6.0 and 7.0.
- Watering Needs: Maintain moderate moisture control by watering directly at the root base while avoiding stagnant water.
- Air Circulation: Ensure consistent airflow around the foliage, and protect the root zone with a mulched crown area.
Understanding Key Features of Haucera Foliage
Distinctive Mounding Habit and Size
The natural growth habit of haucera forms neat, compact mounding cushions. Generally, individual plants grow between 8 to 18 inches tall and spread up to 24 inches wide. Consequently, this uniform shape creates a clean appearance along garden borders and front edges.
Intricate Leaf Patterns and Textures
Modern leaf textures range from glossy smooth surfaces to heavily ruffled and deeply lobed edges. For instance, many varieties display dark, intricate veining that contrasts beautifully against lighter base shades. As a result, these multi-toned patterns add instant visual depth to any outdoor garden design.
Slender Summer Flower Spikes
During late spring and early summer, delicate flower stalks rise gracefully above the dense foliage mass. Small, bell-shaped blossoms appear in shades of pure white, soft pink, coral, or deep red. Moreover, these airy flower spikes attract helpful hummingbirds and beneficial native bees throughout the warm summer months.
Adaptable Fibrous Root Structure
The plant relies on a short, sturdy rhizome system supported by fine fibrous feeder roots. Because these shallow roots spread laterally near the soil surface, the plant establishes quickly in raised beds. Consequently, this efficient root architecture allows haucera to grow reliably in shallow decorative pots or rocky landscape crevices.
Selecting Popular Haucera Cultivars and Color Types
You can categorize popular cultivars into three distinct visual groups based on their leaf tones and patterns:
- Dark & Purple Varieties: Excellent choices include Caramel, Obsidian, and Plum Pudding for bold contrast.
- Bright Lime Varieties: Top selections include Lime Marmalade, Electric Lime, and Twist of Lime to brighten dark corners.
- Silver Veined Varieties: Outstanding options include Silver Scrolls, Peppermint Spice, and Frosted Violet for metallic textures.
Deep Purple and Bronze Varieties
Dark foliage varieties bring dramatic contrast when paired next to light green hostas or golden ornamental grasses.
- Caramel: Features warm apricot-orange leaves with deep purple undersides, displaying high tolerance against summer heat and humidity.
- Obsidian: Displays silky, near-black foliage that retains its rich dark color even when exposed to bright morning sunlight.
- Plum Pudding: Offers deeply ruffled purple leaves layered with a metallic silver sheen that sparkles in dappled shade.
Vibrant Lime and Golden Varieties
Lighter cultivars reflect ambient light into dark areas, creating a bright glowing effect beneath thick tree canopies.
- Lime Marmalade: Features heavily ruffled, bright neon-lime leaves that keep their crisp fresh color throughout warm summer days.
- Electric Lime: Shows off large yellow-green leaves marked with striking blood-red veins during cooler spring weather.
- Twist of Lime: Combines tight undulating leaves with vibrant citrus tones that illuminate dark garden corners effortlessly.
Frosted Silver and Veined Patterns
Textured cultivars highlight visual interest by pairing contrasting leaf veins with shimmering frosted surface coatings.
- Silver Scrolls: Features glossy silver-brushed leaves framed by rich burgundy borders and dark metallic purple veining.
- Peppermint Spice: Displays soft green foliage dusted with frosted silver while producing bright pink blooms in early summer.
- Frosted Violet: Shows off deep plum-colored leaves covered with a soft silvery wash that intensifies during autumn weather.
Ideal Sunlight and Climate Requirements for Haucera
Balancing Sun and Shade Exposure
Although growers list haucera as a shade plant, lighting needs actually depend heavily on leaf coloration.
- Dark Foliage Types: Require 2 to 4 hours of morning sun to build deep pigments without burning the leaves.
- Lime and Yellow Types: Demand protected shade because strong direct sunlight can scorch delicate leaf edges quickly.
- Dappled Canopy Light: Provides the most balanced illumination, ensuring vibrant color and steady growth across all variety types.
Managing Temperature Variations and Hardiness
Most varieties perform reliably across USDA hardiness zones 4 through 9, enduring both freezing winters and hot summers. However, high summer humidity combined with stagnant air can cause temporary stress. Therefore, providing proper spacing ensures healthy airflow around dense leaf clumps during humid months.
Soil Preparation and Drainage Techniques
Soil Texture and Nutrient Requirements
Rich, loamy soil packed with organic matter provides the ideal foundation for strong root establishment. Additionally, maintain soil acidity levels near a neutral pH between 6.0 and 7.0 for optimal nutrient absorption. For instance, incorporating rich leaf mold or well-aged compost improves soil structure while releasing essential nutrients naturally.
Preventing Soil Compaction and Waterlogging
Excess moisture around root crowns remains the single biggest cause of plant failure. Therefore, heavily compacted clay soils require coarse sand, fine gravel, or compost amendments to break up dense structure. Consequently, constructing raised garden beds provides an easy solution for ensuring rapid drainage during wet spring storms.
Step-by-Step Guide to Planting Haucera
Planting involves a straightforward four-step process to ensure successful root establishment:
- Dig a Hole: Excavate a planting area twice as wide as the root ball.
- Mix Soil: Combine natural topsoil with organic compost in equal parts.
- Position Crown: Place the central crown high so it sits slightly above ground level.
- Water Thoroughly: Apply water deeply directly at the base to settle the soil.
Choosing the Best Planting Season
Planting during mild weather allows young roots to establish before environmental extremes occur. For example, early spring and mid-autumn provide ideal conditions with moderate soil temperatures and consistent natural rainfall.
Proper Digging and Hole Preparation
Begin by digging a hole twice as wide as the original nursery pot, keeping depth equal to the root ball. Next, mix equal parts excavated topsoil and rich compost together inside a wheelbarrow. Furthermore, loosening the surrounding hole walls with a hand fork helps young tender roots penetrate local garden soil easily.
Positioning the Central Crown Correctly
Carefully set the root ball into the center of your prepared hole. Always ensure the central crown sits slightly above the surrounding ground level. Burying the crown too deeply traps moisture, which quickly leads to crown rot. Finally, backfill the hole with amended soil, tamping gently with your hands to remove air pockets.
Watering and Moisture Management Strategies
| Season | Water Frequency | Depth | Special Notes |
| Spring | 1 time per week | Deep (6 inches) | Adjust watering based on local rain patterns. |
| Summer | 2 times per week | Deep (6-8 inches) | Increase irrigation during long hot dry spells. |
| Autumn | Every 7 to 10 days | Moderate (4-6 inches) | Hydrate deeply before winter ground freezing. |
| Winter | Minimal | Light | Water only during warm dry spells if unfrozen. |
Hydrating Soil Without Soaking Leaves
Always apply water directly to the root zone beneath leaf mounds using drip hoses or watering cans. Consequently, keeping foliage dry prevents troublesome fungal spores from germinating on wet leaf surfaces during warm weather.
Monitoring Container Soil Moisture
Because container soils dry out faster than garden beds, potted plants require frequent moisture checks. For example, test soil moisture daily during summer heat waves by inserting your finger two inches into the potting mix. If the soil feels dry, apply water thoroughly until excess moisture drains out bottom holes.
Essential Fertilization and Nutrient Needs
Applying Spring Slow-Release Fertilizers
Since haucera requires low nutrient inputs, over-fertilizing causes weak, leggy stems and dulls vibrant leaf colors. Therefore, apply a light dose of balanced, slow-release granular fertilizer around the drip line in early spring. This single application delivers steady nutrients as fresh spring buds expand from the central crown.
Using Organic Mulch Top-Dressings
Top-dressing garden beds annually with a 1-inch layer of aged leaf compost provides gentle, natural nutrition. Furthermore, organic top-dressings improve soil texture over time while encouraging beneficial soil biology around root zones naturally.
Pruning, Seasonal Care, and Winterizing
Spring Cleaning and Leaf Trimming
Inspect plants in early spring to clean away old, winter-burned foliage. Next, use sharp, sanitized pruning shears to snip damaged leaf stems near the plant base. Consequently, removing old foliage allows fresh, bright spring leaves to emerge clean and unhindered.
Deadheading Faded Summer Blooms
Once the airy flower spikes fade in mid-summer, slice off spent bloom stalks down to the main foliage line. Deadheading redirects energy back into leaf development, maintaining a tight, tidy mound throughout autumn.
Managing Plant Propagation Pathways
When a mature clump grows dense, you can divide it or take cuttings following a simple sequence:
- Starting Point: Lift and clean a mature, healthy clump during spring or fall.
- Pathway 1 (Crown Division): Perform in early spring or fall by separating rhizomes while keeping the root system intact to produce new plants.
- Pathway 2 (Stem Cuttings): Perform in late spring by removing lower stem leaves, inserting stems into a moist growing medium, and rooting them into new plants.
Protecting Against Winter Frost Heave
In cold northern zones, repeated freeze-thaw cycles can lift shallow rhizomes completely out of the soil. Therefore, apply a 2-inch layer of shredded bark mulch around bases every autumn to insulate roots. However, keep mulch drawn back slightly from the central crown to prevent holding excess moisture.
Propagation Methods for Expanding Your Garden
Simple Crown Division Techniques
Dividing mature clumps every 3 to 4 years prevents central woody dieback while generating free new plants effortlessly.
- Dig completely around the root system using a sharp spade during early spring.
- Lift the entire root ball out of the ground carefully, shaking away excess soil.
- Separate individual rhizome crowns using a sanitized sharp knife or your hands.
- Ensure each new division contains healthy roots along with several strong leaf stems.
- Replant new divisions immediately into prepared soil, watering thoroughly to settle roots.
Rooting Stem Cuttings Easily
- Take 3-inch stem cuttings from healthy crowns during late spring weather.
- Strip off lower leaves, leaving only 2 or 3 tiny top leaves attached.
- Dip the cut stem end into organic rooting hormone powder.
- Insert the cutting into a damp mix of equal parts perlite and peat moss.
- Cover container with a clear dome to maintain high humidity until new roots form.
Preventing Pests, Diseases, and Root Problems
Controlling Vine Weevils and Garden Slugs
- Vine Weevil Larvae: These underground pests feed on roots, causing plants to suddenly wilt despite wet soil. Apply beneficial nematodes during spring or autumn to destroy larvae biologically.
- Garden Slugs: Slugs chew jagged holes along tender leaf margins during damp weather. Spread iron phosphate bait pellets around plant bases to prevent slug damage safely.
Managing Crown Rot and Powdery Mildew
- Crown Rot: Caused by planting too deeply or growing in poorly drained clay soils. Prevent this condition by planting crowns high and improving soil drainage with organic matter.
- Powdery Mildew: White dusty fungal spots appear on foliage during warm, humid weather. Space plants 12 to 18 inches apart to maximize air circulation around leaves.
Creative Landscape Design and Container Ideas
Container Design Layout Formula
To build balanced potted displays, layer plants by their natural growth structure:
- Thriller (Center/Back): Use an upright ornamental grass or delicate fern for structural height.
- Filler (Middle Tier): Combine a dark foliage variety with a contrasting bright lime variety for rich color depth.
- Spiller (Container Edge): Plant trailing ivy or golden creeping jenny to cascade softly over the pot rim.
Shaded Border and Woodland Combinations
Massing alternating lime, amber, and purple cultivars creates flowing waves of color along shaded woodland pathways. Furthermore, pairing haucera with blue-leaf hostas, delicate ferns, and pink astilbes creates rich textural contrast in shade borders.
Pathway Edging and Formal Framing
The neat mounding shape of haucera makes it ideal for lining stone garden pathways and raised garden beds. Consequently, planting uniform rows defines garden borders while adding rich visual structure through every season.
Yearly Seasonal Care Checklist
Keep your plants thriving year after year by following this simple, step-by-step seasonal maintenance routine:
Early Spring Tasks
- Trim away winter-burn foliage near the base.
- Apply a light dose of slow-release organic fertilizer.
- Divide overgrown, woody crowns to boost plant vigor.
Summer Maintenance
- Water deeply at the base during long dry spells.
- Cut off faded flower stalks to encourage fresh leaf growth.
- Inspect leaf undersides regularly for early pest signs.
Autumn Preparation
- Top-dress garden beds with aged organic compost.
- Apply a 2-inch layer of protective mulch around bases.
- Hydrate root zones thoroughly before winter freezes arrive.
Winter Monitoring
- Inspect crowns after severe freeze-thaw cycles.
- Push lifted crowns back into soil gently to protect roots.
- Enjoy persistent foliage color throughout cold, snowy months.
