

Unlocking Tone Control with a Quad Equalizer
Achieving pristine sound quality requires absolute mastery over frequency control. Whether managing live sound enforcement, tracking studio vocals, or fine-tuning a multi-zone installation, audio routing demands clean signal paths. Therefore, the quad equalizer stands out as an indispensable tool for sound engineers and modern audio producers.
Unlike single-channel devices or standard stereo interfaces, a multi-channel equalization setup allows independent signal manipulation across four distinct audio channels. In addition, this design offers immense flexibility for complex stage setups, monitor sends, and surround processing. Consequently, understanding how a quad equalizer works empowers audio professionals to eliminate unwanted mud, tame harsh resonances, and sculpt breathtaking soundscapes.
Furthermore, proper frequency distribution transforms a muddy mix into a punchy experience. As a result, many studios build their entire routing chain around multi-channel processing. Because every room has unique acoustic flaws, having versatile control ensures consistent results across different playback systems.
What Is a Quad Equalizer in Professional Audio?
At its core, a quad equalizer is an audio signal processor equipped with four completely separate processing channels. Each channel operates independently with its own set of filter controls, inputs, and outputs. As a result, sound engineers frequently use these hardware rack units and digital software plugins to manage four distinct audio feeds simultaneously without needing multiple physical processors.
Clarifying Channel Count versus Frequency Bands
Many beginners confuse four-channel routing with a 4-band frequency control system. However, distinguishing between these two concepts is essential when configuring professional setups:
- Four-Band Frequency Control: Divides a single audio track into four tonal sections, which are Low, Low-Mid, High-Mid, and High.
- Four-Channel Audio Processing: Refers to four distinct physical or virtual paths that can process four separate instruments, vocals, or room sends at the same time.
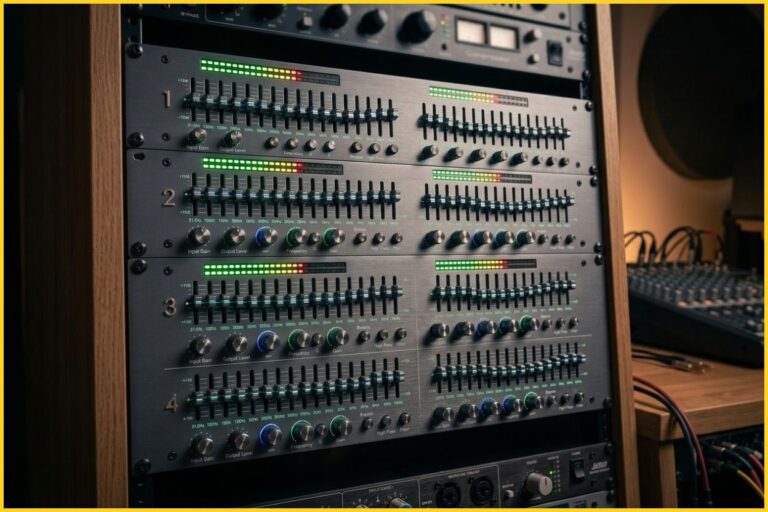
A high-performance quad equalizer may incorporate 30 graphic sliders or fully parametric filter bands on each of its four individual channels. Therefore, this architecture makes it a power-packed solution for complex acoustic environments.
Core Processing Architectures
Understanding the mechanical structure behind processing channels helps you make better purchasing decisions. Hardware units generally fall into two main functional designs.
First, active circuit models use operational amplifiers to boost or cut frequencies with extreme precision. Second, passive circuit models use coils and capacitors to yield a warm, vintage analog color. Both styles benefit multi-channel setups, but active units deliver lower noise floors for live applications.
Core Types of Quad Equalizer Hardware and Software
Audio technology offers diverse processing layouts. Depending on workflow demands, engineers select specific hardware architectures or digital virtual instruments.
Parametric Quad Processing
Parametric processing grants total freedom over filter parameters. For instance, each of the four channels features adjustable center frequency points, gain controls, and quality factors.
Consequently, parametric designs excel at surgical correction, such as finding and removing micro-resonances or targeted boxy resonances without disturbing nearby musical frequencies. In addition, parametric controls allow you to narrow down sharp peaks that cause immediate clipping.
Graphic Quad Equalization
Graphic units utilize dedicated mechanical faders or fixed digital bands placed at pre-determined ISO frequency increments. These faders form a visual curve that represents the frequency adjustments.
Thus, graphic models allow mixing engineers to quickly make broad tonal changes across live stage monitors or main front-of-house PA speaker clusters. Because you can see the whole curve instantly, graphic interfaces speed up live mixing workflows significantly.
Digital Software Plugins
Modern digital audio workstations offer advanced software iterations. Specifically, modern digital plugins provide real-time spectrum analysis, precise dynamic equalization curves, phase compensation algorithms, and instant session recall.
Therefore, these virtual units give bedroom producers and mixing engineers incredible flexibility straight out of the box. Software versions also allow unlimited instances across complex sessions without hardware limitations.
The Four Frequency Zones of Audio Shaping
To utilize a quad equalizer effectively, every sound technician must master the audio frequency spectrum. Breaking down the sonic range into four main operating regions simplifies mixing choices and fast-tracks corrective adjustments.
Deep Low End and Bass Response
The sub-bass region covers frequencies from 20 Hz up to 80 Hz. This zone contains the ultra-low energy produced by sub-woofers, kick drums, and synthetic sound generators. However, excessive energy here consumes immense dynamic headroom and causes amplifier distortion.
Meanwhile, upper bass spans between 80 Hz and 250 Hz, providing warm resonance for bass guitars, cellos, and low vocal registers. Balancing this lower boundary ensures your mix maintains solid weight without causing room rumble.
Warmth in the Low-Midrange
The low-midrange region stretches from 250 Hz to 2 kHz. Instruments like acoustic guitars, snare drum shells, and rhythm electric guitars occupy this primary sonic space.
However, stacking multiple tracks in this zone creates a muddy, boxy overall sound. By gently carving out unnecessary frequencies around 300 Hz to 500 Hz on secondary instruments, you create immediate space for main vocal lines to sit comfortably in the center.
Intelligibility and High-Midrange Punch
Spanning from 2 kHz to 6 kHz, the high-midrange dictates how clearly listeners perceive instruments within a busy mix. Human ears remain exceptionally sensitive to this specific frequency bracket.
For example, boosting 3 kHz adds aggressive bite to rock guitars and enhances vocal articulation. Conversely, excessive build-up near 4 kHz triggers listener fatigue quickly. Therefore, careful attenuation preserves clarity without introducing harshness.
Air, Shimmer, and High Treble
The treble zone encompasses everything from 6 kHz up to 20 kHz. This high-frequency area supplies brilliance, cymbal decay, acoustic detail, and vocal gloss.
For instance, applying a smooth high shelf boost above 10 kHz adds open air to lead vocals. Nevertheless, over-emphasizing high frequencies exposes unwanted background hiss and exaggerates vocal sibilance.
Frequency Region Analysis Table
| Frequency Region | Spectrum Range | Musical Role & Impact | Common Problems |
| Low (Bass) | 20 Hz – 250 Hz | Sub-bass rumble, kick drum weight, bass line foundation | Boomy response, speaker distortion, mud |
| Low-Midrange | 250 Hz – 2 kHz | Vocal fullness, acoustic body, snare drum punch | Boxy sound, nasal tones, build-up clutter |
| High-Midrange | 2 kHz – 6 kHz | Presence, intelligibility, guitar attack, vocal cut | Ear fatigue, harshness, sharp pick click |
| High (Treble) | 6 kHz – 20 kHz | Air, shimmer, cymbal decay, vocal gloss | Sibilance, excessive hiss, brittle tone |
Practical Applications for Live Sound and Studio Production
Having four independent channels in a single rack space or plugin window streamlines signal distribution. Here are key real-world scenarios where these processors deliver maximum efficiency.
Stage Monitor Feeds and Auxiliary Mixes
In live concert environments, stage wedge monitors often feed back when vocal microphones pick up amplified stage sound. Fortunately, a single quad equalizer unit can handle four distinct floor monitor mixes simultaneously.
For example, engineers can notch out specific ringing frequencies on monitor channel one for the lead singer, channel two for the guitarist, channel three for the bassist, and channel four for the drummer’s monitor mix. As a result, you eliminate feedback without needing separate physical hardware rack units.
Multi-Zone Commercial Installations
Venues like restaurants, places of worship, and performance halls frequently separate audio distribution into multiple physical zones. Using a single four-channel unit, an audio technician can dial in specific acoustic corrections for:
- Main dining area or main sanctuary seating
- Outdoor patio or foyer distribution
- Bar counter or secondary delay fills
- Private rooms or green rooms
Consequently, every physical space gets tailored frequency shaping to compensate for unique room dimensions, speaker types, and ambient noise levels.
Surround Sound and Quadraphonic Formats
In surround sound setups or historical quadraphonic music production, four main speaker channels require balanced frequency response. Specifically, these channels include Front Left, Front Right, Rear Left, and Rear Right outputs.
Therefore, employing a dedicated quad equalizer allows pinpoint alignment across every speaker. This alignment ensures seamless spatial movement and consistent audio quality as sound panned across the room.
Multitrack Drums and Instrument Processing
Recording acoustic drum kits requires multiple microphones running simultaneously. For instance, kick, snare, rack toms, and floor toms each require unique tonal adjustments.
By routing these four key drum signals through a multi-channel hardware unit, engineers maintain complete tonal control over the entire kit. Consequently, you achieve tight, cohesive drum tracks before signals reach the main mix bus.
Step-by-Step Calibration Guide for Optimal Performance
Improper gain staging or overly aggressive filter adjustments can degrade audio clarity fast. Therefore, follow this structured procedure to configure your signal path correctly.
Step 1: Gain Staging and Signal Zeroing
Start by resetting all processing parameters. First, set all frequency bands to 0 dB gain. Second, disengage high-pass or low-pass filters completely.
Third, set the master output level of every channel to unity gain. In addition, ensure that incoming levels from mixing consoles do not clip the input stage of your hardware processor or software plugin. Proper gain staging prevents unwanted digital distortion early in the chain.
Step 2: High-Pass Filter Engagement
Unwanted low-frequency rumble wastes amplifier power and muddies up mixes quickly. Therefore, engage high-pass filters on channels handling vocals, guitars, or speech microphones.
For example, rolling off non-essential frequencies below 80 Hz cleans up headroom immediately. As a result, your bass instruments gain extra clarity because sub-bass clutter no longer crowds the low end.
Step 3: Surgical Resonance Attenuation
Rather than boosting missing frequencies right away, use subtractive equalization techniques. First, boost a narrow parametric band by several decibels. Second, sweep across the frequency spectrum to locate harsh resonances or feedback frequencies.
Third, cut those problematic zones by 2 dB to 4 dB. Subtractive equalization preserves dynamic headroom and maintains natural instrument tone without overloading your master output.
Step 4: Broad Tonal Balancing
After removing objectionable frequencies, apply wide, gentle boosts to add warmth or shimmer where needed. Broad Q curves sound smooth and musical to the human ear.
Conversely, narrow boosts often sound artificial and harsh. Therefore, reserve narrow bandwidth settings for notch cuts, while using wide slopes for broad tonal shaping across tracks.
Step 5: AB Testing and Output Verification
Always toggle your processing bypass switch to evaluate your adjustments objectively. Compare the raw signal against the processed output at matched volumes.
If the equalized signal sounds quieter, adjust channel output gain to match the original loudness. Because louder signals trick the human brain into perceiving better quality, level-matched AB testing guarantees that your processing actually improves the mix balance.
Key Advantages of Multi-Channel Equalizers
Investing in multi-channel hardware or utilizing streamlined software workflows delivers distinct professional advantages for working audio engineers.
Compact Hardware Footprint and Efficiency
Space remains a critical factor in touring racks and home studios alike. A multi-channel unit packs four complete processing channels into a compact chassis.
Consequently, this compact layout reduces overall rack weight, saves precious vertical space, and drastically simplifies rear-panel cabling. touring sound crews load equipment faster when multiple channels reside within one physical housing.
Cost Savings for Professional Rigs
Purchasing single-channel processors individually grows expensive very fast. In contrast, acquiring a multi-channel hardware unit offers significant cost savings per channel.
Furthermore, maintenance costs drop because you maintain fewer power supplies, cables, and physical frames. For commercial venues operating on tight budgets, multi-channel gear provides maximum processing power per dollar spent.
Streamlined Interface Navigation
Managing four separate channels on one unified panel speeds up diagnostic checks during live performances. Engineers view signal levels, filter engagements, and gain adjustments across all paths at a single glance.
In addition, modern digital control software groups four channels into color-coded visual tabs. Therefore, workflow speed increases because you spend less time jumping between different menu windows.
Versatile Signal Routing Capabilities
Multi-channel architectures adapt easily to changing performance demands. For example, you can pair channels one and two for a stereo key track, while assigning channels three and four as independent mono monitor outputs.
Alternatively, you can link all four channels together to calibrate complex multi-subwoofer arrays or spatial speaker configurations. This routing flexibility ensures your investment remains useful across diverse audio production jobs.
Common EQ Mistakes and How to Avoid Them
Even experienced technicians occasionally run into mix issues due to poor equalization habits. Staying mindful of these common traps ensures clean sound reproduction every time.
Over-Boosting Frequencies
Constantly boosting frequencies causes digital clipping and phase distortion across your mix bus. Furthermore, heavy boosts reduce available headroom, forcing master limiters to work harder than necessary.
If an instrument lacks clarity, try cutting the surrounding muddy frequencies rather than boosting the high end. Subtractive adjustments yield far cleaner sonic results over complex multi-track arrangements.
Ignoring Acoustic Room Characteristics
Attempting to fix physical room reflection problems with extreme equalization curves rarely succeeds. While a quad equalizer can help tune a PA system, aggressive notch filtering cannot replace proper acoustic treatment, bass traps, and speaker placement.
If a room exhibits severe standing waves, adjust speaker positioning first before relying heavily on processing correction.
Excessive Narrow Boosting
Using high Q values to boost narrow frequency spikes introduces unnatural phase ringing and harsh nasal artifacts. These artificial resonant peaks distract listeners and ruin natural instrument timbre.
Therefore, keep boosts broad and gentle. Reserve narrow filter widths strictly for surgical notch cuts when removing feedback or unwanted electrical hum.
Equalizing Instruments in Solitary Isolation
Mixing an instrument while listening to it in solo mode often leads to poor decisions. An acoustic guitar might sound full and rich by itself, but it can easily overpower the bass guitar when unmuted.
Therefore, always make final tonal adjustments while listening to the full mix context. This approach ensures every instrument carves out its own distinct space within the entire frequency spectrum.
Advanced Routing Strategies for Multi-Channel Processing
Integrating a multi-channel unit into complex hybrid workflows requires strategic routing knowledge. Maximize your hardware or plugin efficiency by adopting advanced patching techniques.
Parallel Processing Chains
Parallel equalization involves splitting an audio signal into two duplicate paths. You keep one channel dry while applying extreme equalization curves to the second channel.
Afterward, blend the processed path back underneath the natural dry track. This technique allows you to inject aggressive top-end air or heavy low-end punch without destroying the natural dynamics of the original performance.
Mid-Side Matrix Integration
Converting standard stereo signals into Mid-Side components unlocks incredible spatial control. By routing Mid (center) information to channel one and Side (stereo width) information to channel two of your quad equalizer, you process spatial dimensions independently.
For instance, rolling off low frequencies on the Side channel tightens stereo image width, while boosting high frequencies on the Sides widens the soundstage without sacrificing center vocal clarity.
Sidechain Dynamic Filtering
Modern software equalizers support dynamic tracking driven by external sidechain inputs. You can configure channel three to duck specific frequencies whenever channel four receives a trigger signal.
For example, set your bass guitar channel to automatically duck 100 Hz whenever the kick drum strikes. Consequently, this dynamic relationship prevents low-end frequency masking without making permanent structural cuts to the bass tone.
Final Thoughts on Elevating Your Mix Quality
Mastering the quad equalizer provides total command over multi-channel audio setups. Whether balancing separate stage monitor mixes, managing zone control in commercial sound systems, or shaping multitrack drum setups in the studio, a four-channel layout delivers unmatched efficiency and sonic accuracy.
By understanding frequency ranges, practicing subtractive equalization, maintaining clean gain structure, and avoiding common processing traps, you can consistently achieve polished, professional sound across any acoustic environment.
